

Makoto Azuma


Styrogami
For the styrogami project we were told to use an exacto knife to carve out a paper cup and to make a sculpture out of it in a way that it showed relief. In most of my artwork I almost always add girly touches and in this piece I decided to carve out hearts around the bottom of the cup to look like butterflies and on the bottom of the cup I carved out shapes to make it look like a flower. I've rarely used exacto knifes so this was one of the two times i've used one. It was a little complicated at certain times but I do believe that practice makes perfect and it did because I used an exacto knife in my second project and I was better at cutting things with it. This sculpture wasn't really of anything. I didn't intend for it to look like something. I just wanted to make as many pretty shapes as I could. If I were to do styrogami with a paper cup again I think I would use more than one cup to actually make it look like something.


Relief
For the relief project we were supposed to make something out of cardboard or clay. I chose to try cardboard and made a camera. I did have reference photos of different styled cameras and I did incorporate them when figuring out where to place what and how the artwork would look like in the end. For the back of the camera I didn't really look at pictures I just used what I knew which was that theres a screen and a power button and other buttons for different uses on every camera that I've seen. I had never used cardboard in any of my projects before so that was new to me. At first I had thought that it would be hard to put all the pieces together but it really wasn't it just took a lot of time to finish. I did use an exacto knife to cut out every piece and I gained skill with it because before I had a lot of trouble with getting the lines to not look completely messed up. Overall, i'm happy with the finished product.


Animal Head
For the animal head project I chose to try to make a polar bear. Before starting the project we had watched videos showing different techniques to use to shape the head and the facial features which I used when I started mine. I think the hardest part was making the nose because since it was a baby polar bear the nose is supposed to come out farther than the eyes so it was flat when I had first made it so I had to add a lot more clay to it and even now it still looks lopsided. I didn't want to glaze it using one color because I thought it would be to simple if it was just white. I did try to add fur using the brown color but it didn't turn out like that but i'm still happy with how it turned out.


Vessel
https://www.pinterest.com/alvaradodomingu/vessels/
The first thing I did for the vessel project was make a pinterest board of ideas of what I could possibly choose to do. I found one I really liked. It was a sort of jewelry box with a big butterfly on one side and on the top it had a small butterfly in the center. I really liked the shape of the whole thing and I wanted to make one just like it but I thought it would be too hard to get the shape to come out right so I decided to make a regular square box and on the lid I added a small butterfly to the center. After glazing the entire thing light blue I thought it needed something more so I used a darker blue glaze and added a big butterfly to two opposite sides.
The first thing I did for the vessel project was make a pinterest board of ideas of what I could possibly choose to do. I found one I really liked. It was a sort of jewelry box with a big butterfly on one side and on the top it had a small butterfly in the center. I really liked the shape of the whole thing and I wanted to make one just like it but I thought it would be too hard to get the shape to come out right so I decided to make a regular square box and on the lid I added a small butterfly to the center. After glazing the entire thing light blue I thought it needed something more so I used a darker blue glaze and added a big butterfly to two opposite sides.
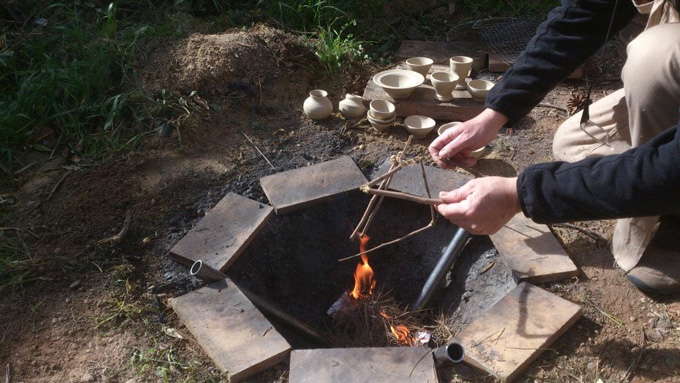

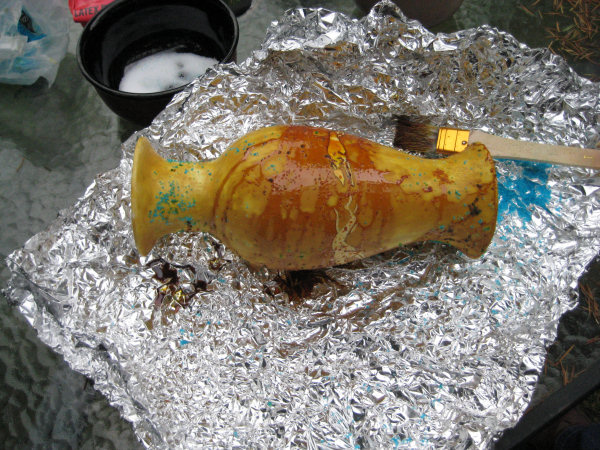
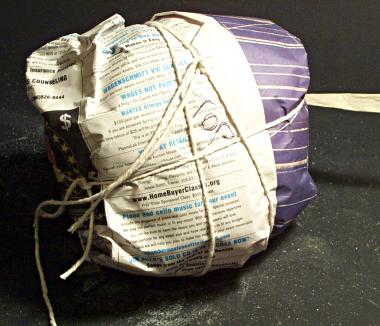
Pit and Can Firing
Pit firing is the firing to accomplish ceramic hardening in a hole in the ground or a cave. It is the oldest method for firing pottery. A foil saggar is a firing that uses foil to keep the piece safe when its being fired. Paper saggar firing is when you use paper as a sagger to fire the pottery. These techniques help to prevent the pottery from getting destroyed and they help to add different colors and designs to the piece.

Free Project
For the free project I wasn't sure what I wanted to do since the medium was kind of limited but in the end I decided to use straws since I had a lot of them and hadn't used them in any project before. I chose to make flowers with them because I thought it'd be easier. The only things I needed were the straws, scissors, and a glue gun. For the center of each flower I also used a straw and I did so by wrapping it into a circle and glued it down. For each petal I used one straw and I just bended it and glued it to where it made the shape of a big petal and I continued this for the other petals and flowers.

Pit Firing Piece
As my pit firing piece I made a small bowl looking piece out of clay. I didn't use a pottery wheel so I built it out of clay using clay "snakes" and stacking them on top of each other and then fixing it so it looked like one piece of clay. I had originally planned to add a top to it but since I didn't have much time I chose to just leave it as one piece and I'm content with it. Before firing it I added sticks in the inside and outside and lace to the sides and chemicals. After the firing it looked grey and black and orange and I think it looks pretty cool. I would definitely want to make another one if I had the chance to. I would also want to try making pottery using the wheel.


Dwelling Project
For my dwelling project I made a castle using cardboard, paint, paper, and pipes. The first thing I did was used a piece of cardboard that was already in the shape of a box and I just glued the sides and painted it white and blue for the door. I wanted the castle to look like the famous Disney castle because I've always liked the combination of colors so that's why I chose white and light blue. For the sides I cut a pipe into four pieces, painted them white and glued them to the sides. Then I placed a cone made from paper on top and painted it light blue. At the top of it I made a circular tower and painted it white. If I would've had more time I would've added more details to the towers on the side and to the second level I would've added more to it as well but I'm still content with how it turned out.
Exam Questions

1.) I think my most successful project was my first relief project. For the theme I chose flowers and vines. The medium I used was clay. The first thing I did in making this is I made a thick clay square then I designed the brick part with a tool and cut out all the vines and flowers and stuck them on there. It's my favorite because I like how it turned out with all the colors and the bricks.
2.) If I could have a do over for one of the projects it would have to be the free project. For this I made flowers out of straws. I just didn't enjoy it as much because it was too simple. If I could do it over I would've used a different medium and topic. If I didn't change topic I would've tried to make a garden for the flowers and added more detail to it.
3.) I enjoyed working with clay the most. For past art classes I didn't get to use it as much but I always liked it. I would like to learn more techniques in the future and to explore different ideas. The one thing I really would want to try is making pottery with the wheel everything looks so much more neater and well put together with it so that is definitely what I would want to do in the future.
4.) Skills and techniques that i've learned in the past history from other art classes is using clay and using tools to create the pieces. In this piece I made a box as my vessel and I'm really happy about how it turned out because in my art one class I tried to make one and after firing it it had exploded because I hadn't put the slabs together right and in this sculpture class I learned more about it so I was able to put them together with no trouble and fortunately it came out right and did not explode.
5.) What I found most difficult about this class is coming up with ideas for projects. I have never been a creative person so that's always the hardest part about making projects for me because the possibilities for ideas are endless but I always tend to stick to flowers and pretty colors. In this class though I found that making a pinterest board before starting a project was very helpful to me and it was easier for finding the right idea.
No comments:
Post a Comment